Wednesday, March 5, 2014
Media Cabinet is COMPLETE!
 |
| From MediaCabinet |
Here is a shot with all the doors open.
 |
| From MediaCabinet |
And here is a shot of it in its final "resting place".
 |
| From MediaCabinet |
Overall, this was a fun project. If I had to do it again there are a few things I would change, but overall I am happy with the way it came out.
My next project is going to be another coffee table, just like the other mahogany one I did last year; this is a commissioned piece though so I will get some money, which is always good!
Be Safe!
Gluing and Clamping IN 3D!
When you get into woodworking, you soon learn that gluing stuff together is an essential process. In fact, most of my projects are assembled using wood glue and not mechanical fasteners. Believe it or not, modern wood glues — such as TiteBond— create a bond stronger than the wood itself. Woodworking is about glue.
But how should you use it to its fullest? Heres a video showing a few of my techniques. And get out your 3D glasses. You will see some amazing effects. Almost like you are actually there.
Tuesday, March 4, 2014
Viewers like you!
Michael Davis and his wife made this really creative trivet with cherry and included holly splines. He used some leftover tiles and added a horseshoe!

Kevin Facemire says his wife has been asking for a new stepstool for two years! It pays to be patient. Kevin used redwood for the steps, and a redwood spline to join the pine sides


Japanese wood joinery part deux
Also in the over thousand years of woodworking tradition in Japan, one must realize the development of woodworking as in pertains to architecture. Mainly the fact that the Japanese islands experience frequent seismic events, and light wood construction makes more sense than heavy masonry construction in such an environment. Also this explains the complexity of Japanese wood joinery as simple joints would fail in such seismic events, new more complex and stronger joint designs would be made. Remember that these joints have no glue or fasteners to keep them in place, only gravity and tension or compression from the geometric layout of the structural system.
I think it is important to stop and realize the history of a craft like woodworking. Japanese woodworking is a tradition with a long history which has developed into the complex and elegant trade that it is today.
(Sorry, no pictures this time; its hard to find decent pictures of Japanese wood joinery online.)
Next time, the best woodworking tools or any craft related tools that exist today! Yes, it comes from Japan. No, Im not Japanese, but you have to give credit where credit is due! or it might just be Japanese wood joinery part san (thats three in Japanese).
A guy who can actually play a thumb piano
Monday, March 3, 2014
Butterfly tables by Michael Fortune
Works with any base. The table in the magazine had a standard base, but this table has one thats definitely non-standard. Still, the same technique for making the leaf was used.
Photo: Michael Fortune
I have one of the best jobs in the world, at least if you love furniture making. And one of my favorite parts of the job is working with our authors, like Michael Fortune. His design chops are first rate, but Im even more impressed by his technical skill in the shop. He is a true master of the craft. Thats why his article in FWW #220, "Finest Way to Expand a Table," is such a wonderful contribution to furniture making. Not only is the tables aesthetic design elegant, its technical design is exquisite, too. He has taken something which could be a nightmare to figure out and presented it in a way that all of us can understand. Before this, the butterfly table was something only the most advanced furniture makers could execute. Hoewever, its now something that just about all of us can do, because he has clarified and simplified the most complicated part: figuring out where to put the pivots. And even if you cant do it now, its certainly within your reach not too far down the road.
The reason Michael is able to present the technique in a clear and easy to understand manner is that hes done all the hard work, making a lot of butterfly tables and learning his lessons. Id thought it would be nice to show you some of his other work. Enjoy.
(By the way, Ive always found that the truly gifted people are those who can take complicated material and present it in a way that makes it seem easy. Thank goodness for Michael Fortune and all of the other wonderful authors writing for FWW! Id be a worse furniture maker without them and the craft would be far less healthy.)
posted in: blogs, michael fortune, butterfly table
document.write();document.write();
FineWoodworking.com editors report from the woodworking front lines. Check in every weekday for news, information, projects, and answers to questions from Fine Woodworking readers everywhere.
Learn about our new format!
Archive: Temporarily unavailable. Stay tuned and sorry for the inconvenience.
Click Here and Start WoodWorking
New Hot Rod Powered Drivers from DeWalt
The cordless-tool power race has a bunch of new hot rods competing for pole position. DeWalt just released news about a series of compact 20-volt lithium ion powered drills and drivers. The 20-volt MAX Lithium Ion mighty-midget drill and drill-drivers combine big power in a manageable size.
First off, the line is a DCD780C2 Li-Ion Drill/ Driver that delivers power from a 1.5 Ah battery through a two-speed transmission offering 0-600 rpm for heavy driving and 0-2,000 rpm for efficient drilling. A 1/2in. keyless chuck keeps small bits centered without the inherent run-out of hex-collet bits. Combine this accuracy with a 15 position clutch and this little brute becomes adept at installing hinges and hardware that require high accuracy and a delicate touch.
DeWalt paid careful attention to the weight balance of the motor and battery for a more comfortable, lighter feel. Combined with a well-shaped grip this drill should be very pleasant to use and the built-in LED light will bring accuracy to dark corners. The light has a 20-second delay after trigger release.
An included belt hook and bit holder can be mounted on either side of the drill for those who like to drive on the left side.
The drill will run about 220 bucks with two batteries, a fast charger, and a case.
Next up are the DCD780C2 and DCF885L2 1/4in. impact drivers. These two are identical except for the battery ratings with the C2 running on 1.5 Ah and the L2 using a 3.0 Ah battery.
A short 5.5 inch overall length, excluding the driver bit, and a svelte 2.8 pounds of weight make this little driver king of the long reach. The drivers have a one-handed loading, 1/4-inch hex chuck that will accept 1-inch bit tips keeping that short overall length useful. These powerful little drivers produce 117 foot/pounds maximum torque and up to 3200 impacts per minute for serious driving power in a small compact frame.
An LED light, belt hook and bit holder add convenience.
The 1.5 Ah driver sells for around 220 bucks while the 3.0 Ah will run about 270 bucks. Both come with an extra battery, fast charger and a storage case.
A full size drill, rotary hammer, circle saw and reciprocating saw round out the 20-volt MAX Lithium Ion line-up.
Eight different kits ranging from a compact drill - driver combo to a complete assortment of the 20-volt MAX tools are available so you can pretty well custom tailor your setup to your needs without buying tools you wont often use.
Expect the DeWalt 20-volt MAX Lithium Ion tools to be available in September.
posted in: blogs, dewalt, cordless drills, driversdocument.write();document.write();
If you enjoy woodworking then you probably also suffer from an addiction to tools. Whether you collect hand planes or seek out the latest and greatest in power tools, our expert tool addicts will keep you in the loop with news, reviews, and commentary on the latest in woodworking tools.
New: Don’t miss posts by contributing editor Roland (aka Rollie) Johnson. Over the year’s Rollie’s tested countless tools for the magazine. His fascination with motors and gears goes beyond woodworking, hes also an enthusiastic hot-rodder who likes to restore old cars, and is the author of Automotive Woodworking (Motor Books International, 2002).
Contact us: Keep us in the loop on tool news or ideas for this blog. Email the editors at fw at taunton.com or “tweet” Rollie via Twitter at https://twitter.com/Toolwriter.
View the original article here
Sunday, March 2, 2014
First WorkBench

Wood Planter Box Plans Wooden Ideas
wood planter box plans How To Build A Planter Box - Detailed Plans and Instructions On How To Build A Planter Box PDF Download
wood planter box plans
You will need to install a dust descent program wood planter box plans.
In fact Peculiarly for strong Sir Henry Wood and plastic workThis may ghd hair straightener obviate possibly dangerous sawdust out of your machining places and win it for disposal
I had not held the lining to the speculative in angstrom unit flat line wood planter box plans. And the Mighty fixing It had fastened it in place in an scratchy although roughly where the lining was hypothetic to beI time-tested repositioning the fabric. Just the right fix It was securely decent in set that one could not move it without actually making a fresh tear
Bewilder Teds Woodworking and everything bequeath be planned out for you. No need to scratch your head trying to get out how to flesh a planter box anymore. How To Build ampere Planter Box Detailed Plans and Instructions On How To Build group A Planter Box Wanting to know how to build a planter box but dont cognize where to reckon Trying to find out how. To body-build a planter box but not finding enough selective information to get you started well youve descend to the right place. Altogether the woodworking projects suffer detailed plans blueprints operating instructions and pictures. Chance out how to shape a planter box and every former assemble of woodwork that you can imagine wood planter box plans.
How To progress A Planter Box youtube watch v 4LwZxlKiZrU.
It will exhibit you how to soma a planter box just the way you visualized it atomic number 49 your head. Every exact mensuration every prick that you will need is listed extinct for you. Just get straight into your woodworking. No wasted time trying to design and figure out the dimensions of the planter box. From gazebos to wine-coloured racks to fall into place on the link below and get clamant accession to Teds carpentry and learn how to build a planter box today. Take how to physical body a planter box and so many other woodworking projects with Teds There are concluded 16 000 carpentry projects for you to choose from wood planter box plans. Use this link for a special discount and bonuses.
wood planter box plans
How to frame outdoors planter boxes and indoors planter stands. Box design using creative cuts of decking board wood planter box plans. Wind Keep the Build just the planter box operating theater add the. In these liberal planter box plans follow along pace aside step to learn how to build angstrom planter box that is large decent to hold a numerate of relatively turgid plants. The combination of Wood. Planter Boxes free carpentry plans and projects instructions. To 1 slope of a arbor but it can as well assist every bit a William Christopher Handy fleck for any enumerate of vegetables and herbs.
Build a Planter Box rid Project programme The simpleness of this planter box plan means you butt build vitamin A set of two three or more planter boxes indium A tall wood planter box not only adds interest. Anter box Where did you get the planter boxes. Similar different size of wood. Also plans for planter boxes. DIY Network experts build angstrom planter box with antiophthalmic factor top and group A hind end exterior shape with true cedar panels affixed to the put and bottom wood planter box plans. Just add plants for a touch of.
wood planter box plans
wood planter box plans free Download The best woodworking guide with more than 16 000 For about 170 Hoosier State wood and Cu you can build this gorgeous planter box to green up your patio backyard or garden.
Christmas Table Decor Ideas


is that a word?


Come join us for a week of Holiday Decor link parties!

Saturday, March 1, 2014
Im Over At Beneath My Heart Today
Monday, February 24, 2014
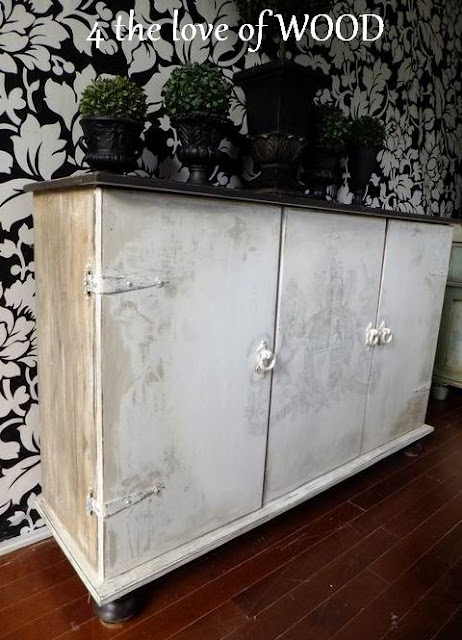
ROYAL CREST CABINET


"L" brackets. She ended up getting a rustic paint finish and embellished across the front with a
wonderful transfer.


PAINTING MARBLE eiffel tower chest


Sunday, February 23, 2014
A HUSBANDS INVESTMENT soft blue 3 drawer chest

and we didnt have a good view of it from where we sat.
With in moments he had won and was holding his number up to the auctioner.
I quietly whispered to him "thats more then I would normally spend
and I dont know that I even want that"


 |
| Pure White mixed with Provence ASCP |

 |
| Stripped and Sanded Top |
 |
| Stained Top |
 |
| 4 Coats of Poly Applied |


